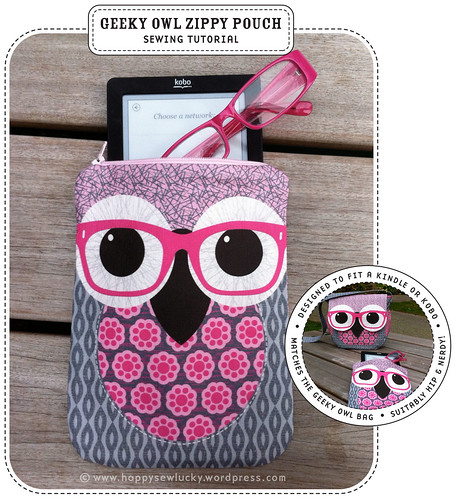
Owl Zippy Pouch Tutorial = Kindle-tastic!
Thanks to everyone who voted in the Spoonflower Bag contest. My Geeky Owl bag placed 8th. Woot!
In addition to a pink version, I have also since added additional versions for the Linen-Cotton Blend fabric. It is awesome fabric to work with and it holds the bag shape a bit better than the lighter weight Kona. The Linen is 54″ wide, which also allowed me to lengthen the strap on these versions. But that’s not all. There was still extra space left over, and I hate to waste fabric, so I added in a bonus matching Geeky Owl Zippy Pouch on the two Linen versions. (Double woot!!) And this my dears, is the tutorial.
This tutorial uses the bonus zipper pouch fabric that is part of the Linen versions of the Geeky Owl Bag fabric available here (pink & grey) and here (yellow & turquoise). (Note that the Kona versions do not include the Zippy Pouch due to lack of space as it is 12″ narrower than the Linen)
If you’d like to make a zippy pouch using this tutorial with your own fabric you can easily follow along. Cut 4 pieces of fabric 9″ x 7″ (225mm x 175mm) – 2 for lining, 2 for the outside, and 2 Zipper Ends 3″ x 1″ (75mm x 25mm).

FYI the pattern for this whale pincushion is available as a pdf in my Etsy shop.
PATTERN INFO & HANDY TIPS:
Seam allowance = 1/4″ (6mm)
Double stitch at start and end of all seams. Sew at a SLOW speed when going around curves. It makes accuracy so much easier. Use pinking shears for notching curves – it’s easier, quicker and there’s less chance of you snipping your seam.
STEP 1: PREPARATION
A) Press your fabric. Cut out all your pieces along the black lines.

B) Use a fabric marker or pencil to transfer the black dots on the one Lining piece to the Wrong Side of the fabric with two lines. (If you’re using your own fabric, these lines should be 3″ (75mm) apart on the bottom end of one Lining piece.) I draw lines instead of dots when I transfer as it’s easier to see them coming when you are sewing.

STEP 2: ZIPPER PREPARATION
A) Fold the Zipper Ends in half with Wrong Sides together. Press.

B) Pin the Zipper Ends onto the zipper with the folded ends towards the zipper centre, covering both the metal block on one end and the end of the zipper opening on the other end. The space between the two Zipper Ends should be 5.5″ (137mm).

C) Top stitch over both the folds to secure the Zipper Ends to the zipper.

STEP 3: POUCH SIDE ONE
A) Place Zippy Pouch Front Right Side Up. Open the zipper half way, then place it Right Side Down along the top edge of the Pouch Front as shown. Make sure that the 5.5″ space between the Zipper Ends is centred on the Pouch Front horizontally.

B) Place one of the Zippy Pouch Lining pieces Right Side Down on top, matching up all the sides and rounded corners.

C) With your zipper foot on your machine, stitch the zipper in place. *NOTE: Start at the closed end of the zipper, stop about 1/3 of the way along with needle down in your fabric, lift the foot and open the zipper to the end to move the bumpy zipper out the way so that you can get a nice straight stitch line. Drop the foot back down and then finish the line of stitching.*

D) Here’s is where you are at:

E) Fold the two Pouch pieces Wrong Sides Together back onto each other. Press.

STEP 4: POUCH SIDE TWO
A) Unzip your zipper halfway again. (more than shown in pic below) Place Zippy Pouch Back Right Side Up. The Place Zippy Pouch Front on top with Right Sides Together. Line up the top edge of Zippy Pouch Back with the top edge of the zipper, and the sides of Zippy Pouch Back with the sides of Zippy Pouch Front. *Note that the bottom edge will not match up.*

B) Place your last Zippy Pouch Lining on top with Right Side Down as shown. Again, match up the tops and sides, but not the bottom.

C) Stitch along the zipper as you did in STEP 3C. The trim Zipper Ends as shown.

D) Open up the pouch sides and press the seam along the zipper.

STEP5: POUCH ASSEMBLY
A) Open the zipper. Place the two lining sides Right Sides Together and the Zippy Pouch Front and Back with Right Sides Together. *Note: Pins should be on the side that you made your markings between the dots in STEP 1(B).*

B) Stitch all around the edges leaving a space open between the dots. Trim a little of the bulk at the zipper without cutting your seams. Notch around the curved corners. (Sorry I forgot to take a pic of this but if you don’t know what it means you can see an example on the bag tutorial here.)

C) Turn right side out through the opening between the dots. Press the front nicely. Turn the seam allowance at the opening inwards and press.

D) Topstitch the opening in the lining half closed.

E) Tuck Lining inside the pouch, smoothing out the fabric as much as you can. Use a chopstick, knitting needle or semi-pointy stick to poke the corners out to be sharp as possible.

Great! You’re done!
Now stuff that pouch with whatever goodies you want. Here are a few ideas:

Who knew I had so much pink stuff in my house!

And here’s a little reminder to rebloggers:
Kindly DO NOT REPOST or use my pics or text without written permission from me. Thank you!


 *10% off for today* (Etsy store only. Price already adjusted.) Inspiration behind this block: On August 6, 1945, #SadakoSasaki was exposed to radiation from the atomic bomb in Hiroshima. She")


Absolutely suitably geeky, but also rather cool. Hoot!
Fantastic tutorial!! love this cute little hoot!
Orders flying in from as far as the southern most tip of Africa. Extremely impressed and delighted with perfect instructions. Thank you HSL.
How do we get one or two?
Thanks for this tutorial. I sew for about 40 years, but sewing bags with zippers was something like a nogo for me. After reading this twice (my english is not so well…) I got it. Good job!!!
Greetings
Viola
Love the owl pouch – would like a big one for my iPad. xoxo