Pumpkin Skellie Tutorial
WOOT! WOOT! Pumpkin Skellie placed 5th in the contest!!
Thanks to everyone who voted. For this project you will need a panel (1 yard, 36″ x 42″) of
Happy Sew Lucky Pumpkin Skellie fabric available here.
Seam allowance:
Large (1 yard version) Pumpkin Skellie = 1/2″ (12mm)
Mini (Fat quarter version) Pumpkin Skellie = 1/4″ (6mm)
Backstitch at start and finish of all seams.
Sew at a slow speed when going around curves. It makes accuracy much easier.
STEP 1: PREPARATION
Press your fabric. Using a pencil or fabric marker, transfer the small dot markings onto the wrong side of the fabric on Arms, Legs, Body Front and 2 Jack O’Lantern Dress Back pieces. (If you have difficulty seeing them through the fabric try putting the fabric on a piece of white paper or against a window during the day time.) Cut out all your pattern pieces along the thin black outline.
STEP 2: MAKING THE ARMS, LEGS & BODY
A) Placing right sides together match up Arm pairs and Leg pairs (matching notches). Line up the shape edges and give them a little tug to match if they need one. Sew around both Arms and Legs leaving an opening on each one between the dots.
2 B) Notch outer curves and snip inner curves. NOTE: The LHS leg shows notching with regular scissors – only necessary around outer curves. The RHS leg shows the job done with pinking shears. (They cut zig zags all around.) You still need to snip the inner corners, even when using the pinking shears. Take care not to snip your seams though!
2 C) Placing right sides together match Body Front with Body Back. Line up the shape edges and give them a little tug to match if they need one. Pin along the ribs to make sure they line up nicely at the side seams. Sew around the body, leaving an opening between the dots.
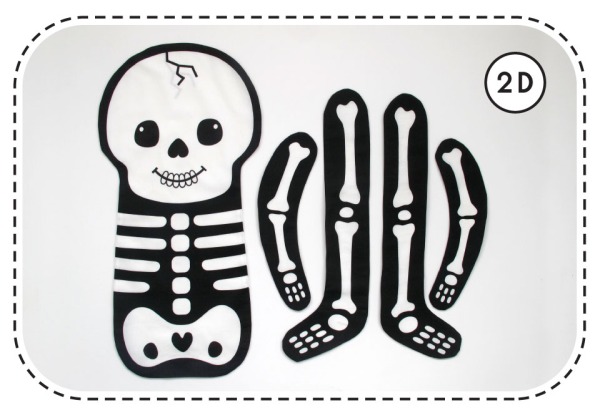
2 D) Turn all Skellie pieces right side out and press. Make sure the seam allowance at the openings is turned in a press a nice sharp edge in them. (This will make stitching up the openings easier later.)
2 E) Stuff Arms, Legs & Body starting with pushing smaller chunks of stuffing all the way to the tips and working your way down. Don’t stuff with huge chunks or you’ll get a lumpy skeleton. Stuffing is a great job for your “assistants” if you have them. And that’ll give you time to and put the kettle on for a cup of tea while they’re at it!
All assistants that do a good job deserve a cookie or two for their troubles. 🙂
NOTE: If you want a floppier skeleton with bendy arms and legs, stuff the limbs less and stitch across knees & elbows. I decided not to do it that way because I want it to be able to stand up against a wall. But floppy & bendy is an option.
2 F) When you’re done stuffing you need to hand stitch up the openings on the arms, legs & body. Using black thread, double stitch to start then stitch your way across with whipstitch.
STEP3: ASSEMBLING SKELLIE
3 A) Using doubled white thread, secure your thread on the lower side seam, about a third up from the bottom of the hip bone.
3 B) Feed the needle through the top of the femur. (the thigh bone)
3 C) Thread the button on the outer side of the femur and pull so that the thread is taut and the leg is firmly attached to the hip.
3 D) Feed the thread back through the femur into the same area that you started. Repeat a few times until the leg is securely attached. Do this for both legs. Now onto the arms!
3 E) To attach the arms start on one side and secure the thread between the first and second rib. Then repeat steps 3A to D to sew the arms on with a button.
3 F) Here’s where you should be at. Time for a quick cuddle with Skellie before you get to the Jack O’Lantern Costume.
STEP 4: THE JACK O’LANTERN DRESS
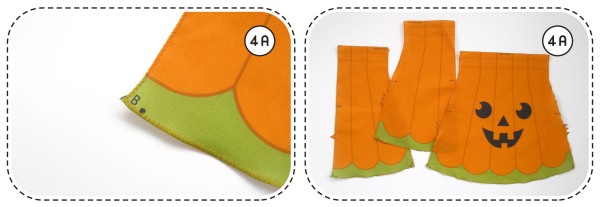
4 A) Zig zag the side and bottom edges of the three dress pieces to prevent fraying, making sure that you keep the darts in place as you do it.. (If you have a serger / overlocker you could serge the edges instead but don’t trim off any fabric. Mark the darts before you do this as the serger will trim them.)
4 B) Place two Dress pieces right sides together, matching single notch at A. Stitch from A to B. Press seam open.
4C) Stitch 1/4″ (6mm) from the edge down the side, across the seam and back up to the top of the opening in the back centre seam you just sewed, to secure the seam allowance.
4 D) Place Dress Back on top of Dress Front with right sides together. Match notches on two side seams. Stitch from C to D and from E to F.
4 E) Press side seam open from the bottom at the hemline up to the point where the straight line angles outwards. At this point cut a small and neat snip 3/8″ (9mm) long into the seam allowance, on both sides of the seam as shown.
4 F) Fold one flap back so that you can continue to iron the seam allowance flat at 1/2″ (12mm). Then iron the other flap in the same way as shown.
4 G) Turn the dress over and repeat Step 4F on the other side.
4 H) Stitch to secure the seam allowance 1/4″ (6mm) from opening edge, down one side, across and then up the other side as shown. Repeat this on the other side seam in the dress. (These openings will be the arm holes.)
4 I) Turn the hem edge up 1/4″ (6mm) and press well all around the hem.
4 J) While you’re at the ironing board, fold down the first flap at the top of the dress and press. Then fold the second fold over and press well again.
4 K) Top stitch along the edge of these three folded sections, keeping the sides and the gap in the centre open. (ie: don’t sew across one section into another. They should stay separate)
4 L) Topstitch all around the hem edge.
4 M) Time to thread the ribbon through the ribbon opening. The easiest way to do this is to fold the end of the ribbon over the tip of a skinny stick of sorts. (I’m using a bamboo skewer here) Start at the Dress Back centre seam and thread towards the one sleeve on the side. Then without twisting your ribbon, make a u-turn and slide it through the Dress Front section, then lastly back through the last Back piece, ending up in the centre of the back again.
 Pop that dress on Skellie with her arms through the sleeves. Tie a bow at the back then head out onto the deck and wait for the party to start. Candy corn anyone?
 If you spot any typos or get stuck at any stage while making this pattern let me know.
Please note that all aspects of this design & tutorial are © Berene Campbell. Please do not copy any images, text or techniques without my consent. Thank you for respecting my work.












So cute! Should have been first place. I can’t wait to make it.
Thanks Kim! I’d love to see a pic of how she fits into your Halloween decorations.
Although the tutorial is perfectly clear, I made the mistake of sewing the leg bone just outside the seam and the fabric ripped apart from the weight of the leg. I will try same project next year with canvas weight fabric. Quilting weight fabric was not going to stand up to the amount of love skeleton was getting. It’s as adorable in real life as it is in photo and my seven year old son loves it. Thanks!
I have just seen this at Poppyprint! Love your design!
I just order mine, and I can’t wait, my kid is going to love it.
Getting to work on Skellie now…super early for next year!
That’s great and no harm in being organized. Not that I would know what that feels like!