Geeky Owl Bag Tutorial
For this project, you will need one yard of Happy Sew Lucky Geeky Owl fabric available here. This design is available in two colours and in files designed to maximize two fabric weights: a Kona version and a Linen-Cotton blend version. The Kona is quilting weight cotton, so makes a softer bag with a 38″ strap. I prefer the linen-cotton blend though, as it holds the bag shape better, and since it is 12″ wider than the Kona, it allows for a longer strap – about 49″ long once sewn on. But best of all, because of the extra width, I was able to include a bonus matching zipper pouch on the Linen version that is large enough to hold a Kindle. (IMPORTANT NOTE FOR ORDERING: Make sure that you pick the design with the correct fabric type in it’s name. i.e.: LINEN or KONA. If you order the design with “Kona” it it’s name on “Linen fabric” it will not include the Kindle pouch pieces. You can see the second owl face for the kindle pouch on the Linen options.)
My initial tutorial was done using the turquoise & yellow design, but I have since added some additional images using the pink. Take care to check pattern piece names as you follow along, to make sure that you are sewing the correct pieces. The initial turquoise and yellow design that I used for the pics did not have the notch markings on it. These were added later to make the pattern easier to follow.
Additional note: Since Spoonflower requires the instructions to be printed on the fabric as part of their contest rules the initial design had them on. But I find that this is a terrible waste of fabric, so now that the contest is over, I have replaced the instructions with an extra pattern piece for an inside pen pocket. If you bought your fabric before this change was made, you can add this pocket by cutting a piece of fabric from your stash to a size of 9.5″ x 6.5″ (240 mm x 165 mm). On the Wrong Side of one of the 6.5″ sides, mark 2 dots 3″ apart, 1/4″ (6mm) from the edge.
The tutorial for the matching Owl Zipper Pouch will be posted by April 25.
NOTIONS:
2“ (50mm) of 3/4” (20mm) wide Velcro
14″ (30cm) of cord Elastic
20″ x 40″ (52cm x 104cm) of Iron-On Medium-weight Interfacing
PATTERN INFO & HANDY TIPS:
Seam allowance = 1/4″ (6mm)
Double stitch at start and end of all seams. Sew at a SLOW speed when going around curves. It makes accuracy so much easier. Use pinking shears for notching curves – it’s easier, quicker and there’s less chance of you snipping your seam.
STEP 1: PREPARATION
A) Press your fabric. Cut along the yellow dashed line to separate the pattern pieces needing interfacing. (to the right and below yellow dashed line) Iron interfacing onto the Wrong Side of all pattern pieces within interfacing area. (Do not iron interfacing onto Zipper Pouch pieces) Cut out all pieces on the black outlines.
B) Transfer pattern markings to reverse side of fabric with pencil or fabric marker on FRONT BELLY POCKET, FLAP INTERIOR and BACK INTERIOR LINING pieces.
STEP 2 – FRONT POCKET:
A) Fold FRONT BELLY POCKET in half with Right Sides Together. Stitch from dot around each side up to the fold, leaving open between dots. Notch curves and trim corners.
B) Turn Right Side Out. Fold in the opening seam allowance at the bottom, and press.
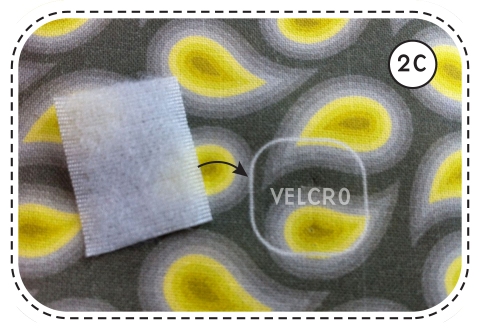
C) Separate velcro strips and cut the soft side in half. Stitch one of these 1” lengths onto Right Side of FRONT BELLY POCKET on where indicated.
D) Place Pocket on Right Side of BAG FRONT EXTERIOR 1.5” from the BAG FRONT bottom edge, centred horizontally. Topstitch Pocket in place, leaving top end open.
STEP 3: SIDE POCKETS:
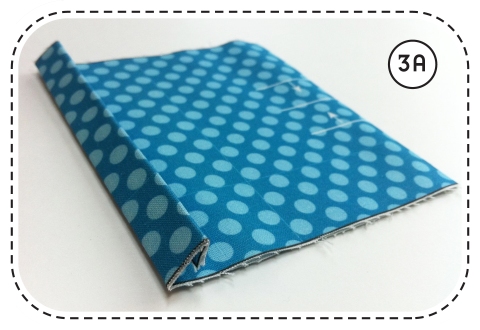
A) Fold both SIDE POCKETS in half Wrong Sides Togther. Press then fold 1/4” (6mm) top edge over line A. Press. Fold 1/2” (12mm) over line B. Press.
B) Top stitch fold down, leaving open on each end.
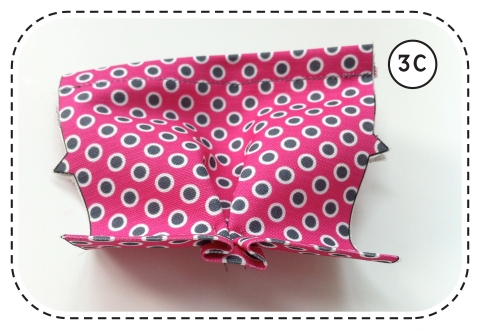
C) Fold and pin box pleats in place so that the “box” is on the side with the markings.
D) Thread the cord elastic through the casing you sewed at the top edge of the pocket. TIP: Tape the end of the elastic to a skewer and push it through the casing. Secure one end of the elastic by stitching over back and forth.
E) Pull elastic until the top side of the pocket equals 3.5”, and secure the other end of elastic down. Repeat this with second SIDE POCKET.
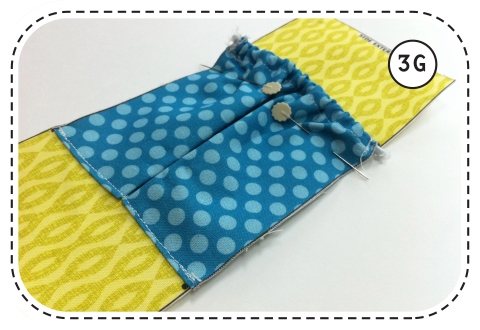
F) Pin each pocket on Right Side of the SIDE EXTERIOR between the dots, matching notches. Note that the elasticated sides of the pockets should be towards the cut ends of this SIDE EXTERIOR piece, and the pleat sides towards the centre.
G) Top stitch the bottom of the pockets into place, securing the box pleats. Pin the elasticated ends down.
STEP 4: BAG BODY
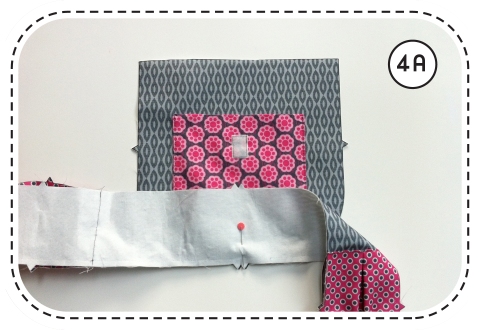
A) With Right Sides Together, match notches at the centre of the SIDE EXTERIOR piece with that of the BAG FRONT EXTERIOR.
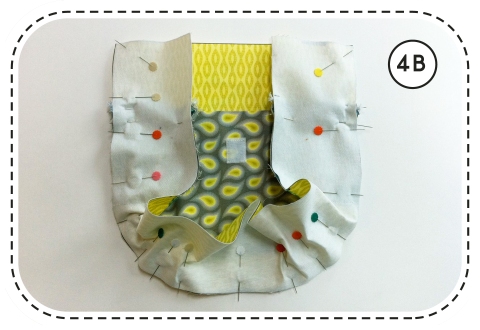
B) Pin at these notches then match the notches on the sides, and the fabric ends. Make sure that the elastic ends of the pockets are in place and have not pulled inwards.
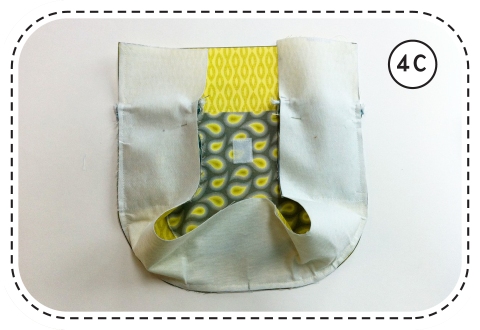
C) Stitch all around one side of SIDE EXTERIOR, leaving open at the top flat edge.
D) Do the same with BAG BACK EXTERIOR, making sure to match the notches as you go.
E) Notch all curves.
F) Turn BAG EXTERIOR Right Side Out. Press seams open as best as you can. If you have a sleeve press, use this to get inside the bag.
PEN POCKET: This piece was added after the tutorial was written, so I marked the pics with an asterix. Apologies for any confusion.
*A) Fold PEN POCKET pattern piece in half with Right Sides Together. Stitch from each dot around the side up toward fold, leaving the space between dots open. Trim corners and turn Right side out. Press turning seam allowance between dots inward.
*B) PLace the pocket piece 2.5″ (64 mm) from the bottom edge of INTERIOR LINING BACK, centre horizontally. (The open edge between the dots should be towards the bottom so that it gets sewn closed when you stitch the pocket on.)
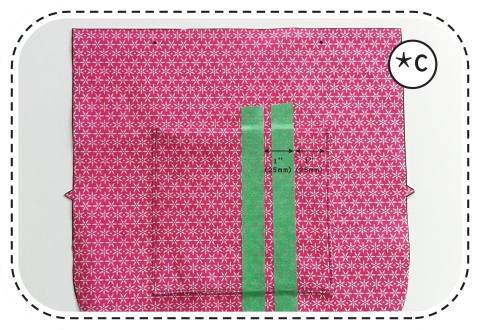
*C) Stitch down the sides, and along the bottom of the pocket. Then using either a fabric marker or painter’s masking tape mark two lines 1″ (25 mm) away from the one side. These will be your pen pockets. The larger pocket will fit either glasses or a phone. You can change these measurements if you prefer other size pockets or if you would rather have lots of pen pockets and no phone pocket.
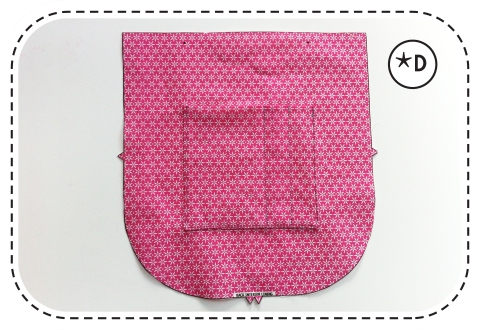
*D) Stitch these two lines along your guides.
OK, that’s that little segway done! Now back to the rest of STEP 4.
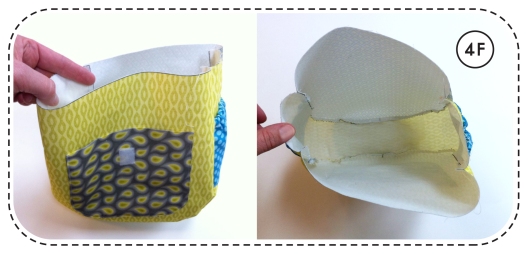
4 G) Repeat STEPS 4 A-F with the INTERIOR LINING pieces. (But don’t turn Right Side Out)
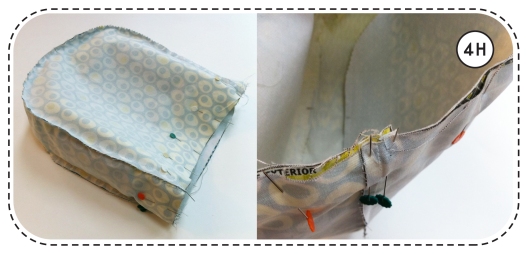
H) Place the bag EXTERIOR inside the INTERIOR LINING with Right Sides Together, lining the top edges up nicely. (Note that the LINING will be 1/2” taller than the EXTERIOR, so the LINING will be hanging lower for now)
I) Stitch 1/4“ from top edge all around leaving open between dots on BACK INTERIOR LINING.
J) Turn bag Right Side Out through opening left at the back.
K) Tuck LINING into BAG EXTERIOR.
L) Press bag edge, turning seam allowance inwards at the open end.
M) Neatly topstitch all around the bag top to close opening between dots, and to secure binding edges.
STEP 5 – FLAP:
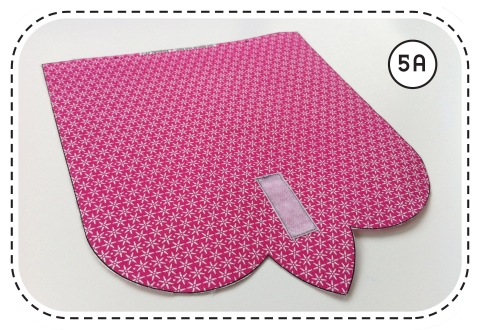
A) Place the 2” length of velcro onto Right Side of FLAP INTERIOR on rectangle marking. (This will be the scratchy half of the velcro). Stitch in place.
B) Place FLAP EXTERIOR onto FLAP INTERIOR with Right Sides Together. Stitch from dot to dot, all around edges leaving open between dots. Snip inner corners at beak, taking care not to cut your seam, and notch around curves.
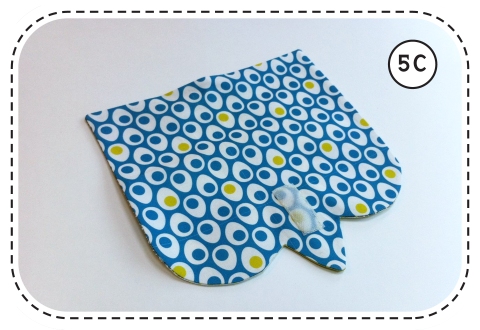
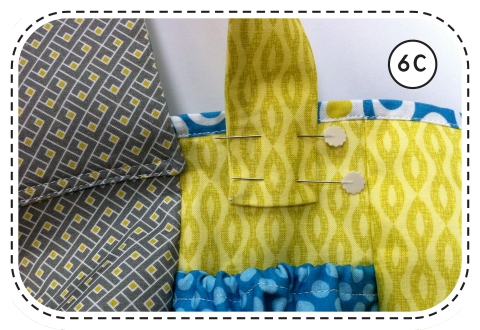
5C) Turn FLAP RIght Side Out. Turn seam allowance at open end inwards. Press.
5D) Place this back edge of the Flap on the EXTERIOR BACK 3/4” from the bag edge.
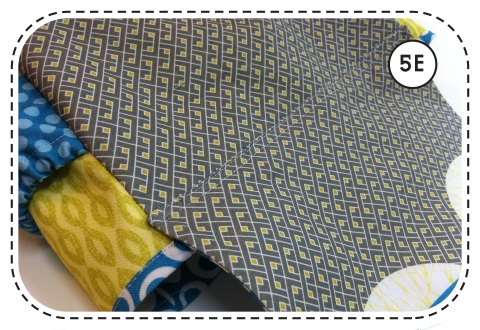
5E) Top stitch FLAP in place and then stitch another line 1/4” up to secure the flap well.
5E) Admire your beautiful Geeky Owl Bag so far. You’re almost there.
STEP 6 – STRAP:
A) Fold STRAP in half lengthways and pin.
B) Stitch an L-shape, closing one end of the strap and then all down the length of it. Trim the corners and turn Right Side Out. Press with seam on side edge.
C) Measure how long you’d like your strap to be, and cut off any excess length. Fold seam allowance inwards at open end, and press. You can top stitch down both sides of the length of the strap if you like. This is a nice finishing touch and helps to prevent the strap from twisting. Place the strap in place on one side of the bag and pin.
D) Stitch on with a box shape then stitch an “X” in the centre. Repeat with the other side making sure that the strap is not twisted before stitching.
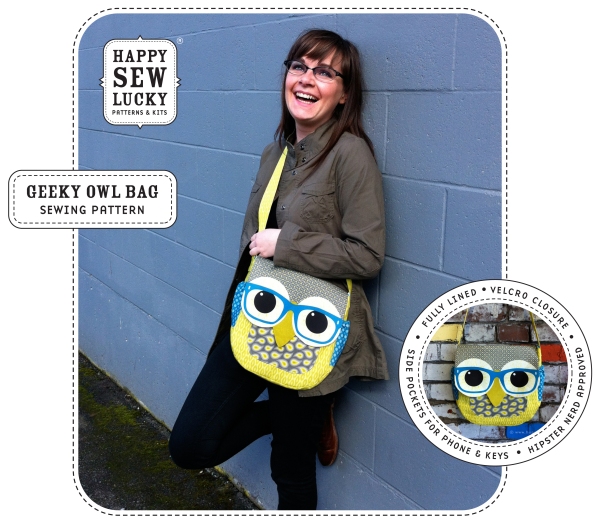
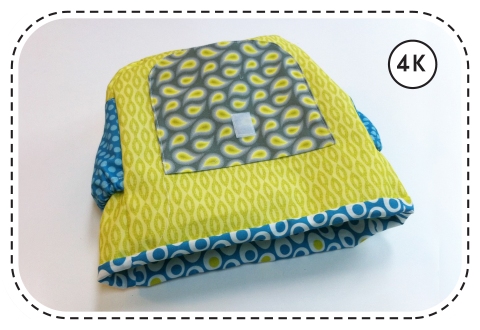
E) That’s it, you’re all done! Woot! Woot! Time to sling your new bag over your shoulder and head out for a spot of shopping!






























Wow, that’s a nice, geeky bag! And a lovely tutorial, makes me want to make at least one 🙂
Thanks! If you do try one out, let me know how you do. 🙂
Wow! I love your thoroughness (in words and pics!)- what a great tutorial! 😀
Thanks, Veronica! I’m never sure if I put in too much detail. Hard to get the balance since my customers vary from novice to super experienced. But I figure a smarty pants can always skim over the obvious steps that are needed for the newbies.
And this tutorial is also great, just to have a look at the pictures answeres questions I didn´t know I have…:)
Thanks again
Viola
Hi Viola
Vielen Dank!
Berene
hi berene!!
i just made this awesome awesome bag! instructions were amazing.. definitely a lifesaver as i don’t have much experience making bags… my friend is going to LOVE her geeky owl bag… do you have other bag designs? i would love to make one similar to this for myself.. but i can’t do a geeky owl bag as well since we work together and it would just be weird!
thanks again!
sylvia (sephie78 on spoonflower.. )
Hi Sylvia
Thanks for the lovely comment. You just made my day! I have been meaning to make some variations on this bag but just haven’t gotten around to it yet. I am open to suggestions of theme & colour. Just can’t guarantee the timing as summer is around the corner and I have a lot of family coming to visit, plus kids home etc. But drop me a line and let’s plan something awesome together!
Berene
Gorgeous bag but i cannot seem to locate the pdf for the pattern ? I’d like to make it for my grandaughter’s birthday next week if you would not mind sharing the pattern or should I use a similar pattern and fumble through ?
Hi Cheryl
I love hearing that people out there enjoy my designs. There is no pdf pattern as the pattern is in fact printed directly onto the fabric available in my Spoonflower shop here: http://www.spoonflower.com/profiles/happysewlucky . There are two colour ways and two versions for each – Kona cotton width and the Linen which is wider and therefore also includes the matching zippy pouch. I would recommend the Linen as the extra weight in the fabric holds a nice shape.
Although I do have a few free items on my blog, I can’t “share” the pattern, as this is my business, where I am trying to make my living. I would ask that you don’t try and copy it, for the same reason. Designing patterns is a lot of work, and it is really hard to protect one’s original designs online. I hope you understand and respect this fact.
I think it’s lovely that you sew for your grand daughter. Hand made gifts are always more precious. I realize that you would not be able to get this fabric in time for her birthday, however if you did decide to order it, it could make a great joint project for the two of you to do together.
Thanks for writing,
Berene.
Yes that’s a lovely thought but unfortunately the child’s mother has forbidden any contact with me so that is not going to be possible until after a family court hearing . Not to worry there are a few patterns out there and i am not completely usless i am sure i will be able to come up with something equally gorgeous for her !!!
LOVE the bag and the tutorial but wanted to note – I very recently ordered this from Spoonflower in the original colorway in linen and did not get the pieces to make a Kindle cover. There is excess in the form of a full sized bag front, but not the pieces needed to make the smaller bag.
Hi Melissa
Thanks for your kindly written note. So glad that you love the bag and tutorial. It seems that you unfortunately ordered the incorrect design for the linen. If you have another peek in my Spoonflower shop you will see that there are KONA and LINEN options for both colours. This is because the Linen is 12″ wider than the Kona. I have now made a special NOTE on my blog post pointing this out, hopefully a little clearer. It was probably an easy mistake for you to make. Thanks for bringing it to my attention.
Since you did in fact pay for the Linen, but did not receive your additional Kindle zippy pattern pieces, I’d like to rectify your problem for you by mailing you the missing pattern. Please email me your mailing address at: berene(at)happysewlucky.com and I will happily pop it in the mail for you.
Your pleasant way of dealing with a disappointing situation is much appreciated!
Berene
You probably wrote this somewhere, but in order to get one bag and kindle case do I buy a fat quarter or a yard?
Hi Phoebe
You have to buy a yard of the Linen. (A yard of Kona will only fit a bag, no kindle case.) In my Spoonfliwer shop two colours of each Linen & Kona. Pick one of the linen options, and you’ll see the extra pattern pieces for the kindle pouch on the side.
Thanks for writing!
Berene
you did very well. and your tutorial is interesting, helpful and inspires..
Just finished making this wonderful bag! Such a cute pattern and a great tutorial. Thank you!
Thanks for the lovely note. So glad you enjoyed making it. Hope you have even more fun using it! 🙂
Hello!
I purchased the fabric in linen from Spoonflower and just came here to get the instructions. Just to let you know however you’ve formatted this page doesn’t allow for Firefox to print the images. I found a way around it by copy and pasting the entire post into a word document. Looking forward to making it!
thanks,
Melissa
Hi Melissa
Thanks for the heads up. To be honest I’m not sure I can do anything about it, since it’s a WordPress theme not my formatting. At least I don’t think so. But I’ll ask my (personal tech consultant) son and see if he can figure something out. I’m glad you found a solution that worked for you in the end. Hope you have fun making the bag!
Berene
I finally bought this bag after years and years of lusting after it, I’m so excited to put it together!
Awesome! Tag me on Instagram to see yours when you’re done.