Pussy March Quilt


PUSSY MARCH QUILT BLOCK LOTTO (& flying geese tutorial)
Inspired by the Women’s March of January 21, and the Pussy Hat Project I came up with an idea for this month’s Toronto MQG block lotto: a Pussy March quilt! Diverse coloured pink triangles marching in the name of women’s rights, and in support of peace and love over hate and prejudice. My husband and I both marched the Toronto march in our hot pink pussy hats, and came home buzzing with motivation to keep the dialogue going. As protesters marched together, so too as a block lotto project, this quilt will represent many hands coming together to symbolize the same unity. And the flying geese block used for this quilt concept, has a symbolic history in helping uneducated slaves from the south find their way north via the underground railroad. (To read more on that see point #11 here.)
I thought I’d share the details of this quilt concept here on my blog in addition to the TMQG blog, in case some of my followers were inspired to make one for themselves. Let me know if you do. And tag your pics: #pussymarchquilt
DEADLINE FOR TMQG: March meeting, March 26, 2017. (Since quite a few members will be away at Quiltcon for the Feb meeting.) As usual ONE lotto ticket BLOCK.
BLOCK DETAILS:
Block pattern: basic Flying Geese block (see tutorials for 2 methods below)
Size: Width: 6” finished (6 ½” unfinished)
Height: 3” finished (3 ½” unfinished)
COLOURS:

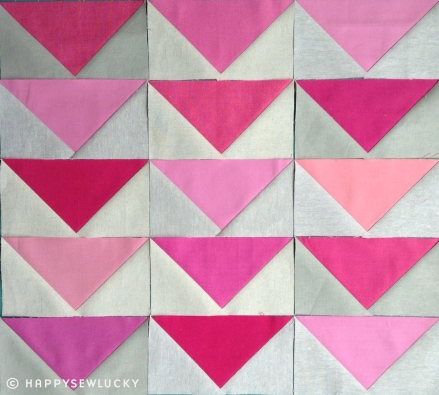
Geese: The larger centre triangle is to be PINK.
Any shade of pink, but please use SOLIDS. (No prints, tone-on-tones, batiks etc.) Use a variety of shades of pink, as diversity is the name of the game on this one!
Sky / Background: The outer smaller triangles are to be linen. Natural beige / taupey linen colours as shown below.
Recommended linen brand: Essex Linen (colours: FLAX, NATURAL, SAND).
(Please avoid the Essex metallics though, as they tend to be a little scratchy)
If you’re not using Essex linen, please make sure the weight you are using is suitable for quilting. Please PREWASH your linen.
A little word in defence of linen:
I know a some quilters freak out about linen, but I think it’s because they haven’t tried it yet. Let me warn you, it’s pretty addictive once you give it a go. And a quilt made with linen has a lovely weight to it – perfect for snuggling in the winter.
Tips for working with linen:
- I mostly use Essex linen by Robert Kaufman
- Prewash it, as it does shrink. Wash it on a warm setting, then tumble dry it on warm too, and take it out the dryer before it’s completely dry. I then arm myself with a spray bottle of water and a spray bottle of starch and go at ‘er till she’s nice and tame. Once that’s done she’s a breeze.
- A nice new blade will glide through her like a knife through butter.
- Stitch with a universal needle 70/10 or 80/12.
- Once pieced I am careful not to manhandle my blocks as they can fray, although I find the Essex linen is generally very well-behaved.
- I press seams away from the linen when I can, but use a wooden roller to train them flat when I can’t.
The end result is a wholesome feeling, somewhat tactile quilt. It’s a beautiful thing!
There are a few different techniques for flying geese. These are my two preferred ways:
FLYING GEESE: option 1 – “the singleton”
Recommended for using up scraps or individual blocks of fabric.
Quilt math: (makes one block)
For the centre triangle (“goose”) 1 x rectangle: finished size + 1/2″ added to width and height. So for our 6″ x 3 ” finished blocks you will need to cut these 6 1/2″ x 3 1/2″.
For the outside background triangles (“sky”) cut 2 x squares: finished height + 1/2″. So for our 6″ x 3 ” finished blocks you will need to cut these 3 1/2″ x 3 1/2″.
Draw a line with a fabric maker diagonally across the backs of the square blocks.

Four rectangles shown will make four blocks.
Pin one square right side down onto right side of rectangle, with the diagonal line starting in the bottom corner and ending in the centre of the opposite rectangle edge. Stitch along just outside the line as shown. This will give you the extra smidge of fabric needed for the fold, so that you can still have an (6 1/2″ x 3 1/2″) accurate size once folded and pressed.


Stitch just OUTSIDE the line.

Fold it open to check for size accuracy, then trim the seam allowance to 1/4″.

Fold it open and press seam allowance away from pink triangle.

Place second square right side down onto the rectangle as shown.

Stitch just outside the line as before. Then trim the seam allowance and press it away from the pink triangle. Trim block to clean 6 1/2″ x 3 1/2″.


*SNEAKY OPTIONAL BONUS*
If you don’t want to waste the trimmings then here’s an extra couple of steps that avoid that and give you some bonus HST blocks to make a little extra somethin’ somethin’.
When drawing your diagonals on your squares draw a second parallel line 1/2″ away from the first on one side. Position it on the outside half of the square. (The part that you would have trimmed and thrown out.)

Stitch along the first main line as instructed above, but then along the second line as well. Trim down the centre as shown. Repeat for the second square. When you’re done you’ll have one flying goose, and two little HST blocks.


FLYING GEESE: option 2 – “quad geese”
Recommended for when you need to make multiples of the same fabric.
Quilt math: (makes four blocks)
For the centre triangle (“goose”) cut 1 large square: finished width size + 1 1/4″. So for our 6″ x 3 ” finished blocks you will need to cut these 7 1/4“.
For the outside background triangles (“sky”) cut 4 small squares: finished height + 7/8″. So for our 6″ x 3 ” finished blocks you will need to cut these 3 7/8″.
Draw diagonal lines across the wrong side of all the small squares.

I have a variety of pinks here – these will make 16 blocks.
Place two smaller squares right side down onto the large square so that the line is one long diagonal line, and the squares overlap at the centre. Pin.

Stitch 1/4″ on either side of the line drawn.

Cut down the centre along the line drawn.

Press the triangles open with the seam allowance towards the small triangles. (Repeat all the following instructions on the second half as well.)

Place another small square right side down with the diagonal line at 90º to the previous seam sewn. Pin.

Stitch 1/4″ seam on either side of the line.

Cut down the centre along the line.

Press triangles open with seam allowance towards the smaller triangles. Trim the minimal excess to finish up with four neat 6 1/2″ x 3 1/2″ unfinished blocks.

Look how beautiful the diverse collection of pinks and linens look together. Whoever wins all the blocks will have a fabulous time organizing all those pink marchers. I pretty exited about this block lotto. Fingers crossed I get the winning ticket!


 *10% off for today* (Etsy store only. Price already adjusted.) Inspiration behind this block: On August 6, 1945, #SadakoSasaki was exposed to radiation from the atomic bomb in Hiroshima. She")