Prairie Points Show Ribbon Tutorial

On August 27 & 28 the Vancouver Modern Quilt Guild is hosting their first quilt showcase at North Van Shipyards Building near Lonsdale Quay. With over 150 modern quilts on display, it’s sure to be amazing. I’ll be sad to miss it. Despite my move to Toronto a couple of years ago I have maintained my membership of the VMQG – because I love those girls (and couple of guys). The show committee has been rounding up volunteers to help organize, and making the show ribbons was a job I could do from afar. So sign me up, Baby!
Inspired by a prairie points mat in my laundry (sweet story about that here), I decided to use prairie points instead of the usual ruffled ribbon. I love how they turned out so I thought I’d share my technique in case anyone was keen to make some for their guild’s shows.
Materials needed (for one prairie point show ribbon):
- 4 ½” hexagonals x 12 pieces for exterior ring
- 3 ½” hexagonals x 12 pieces for inner ring
- 9 x 2 ½ strips for ribbons x 3 pieces
- 3 ½” x 3 ½” front circle fabric (for behind pin)
- 4 ½” x 4 ½” backing fabric
- 7” x 4” iron-on fleece
- 2” x 8” scrap of batting
- Brooch pin / large safety pin
- Elmers white glue
- Fine fabric marker
- Needle & thread
- 3” printed button
- lightweight iron-on interfacing for ribbons
- Template print outs on card – PPribbontemplate and ppribbonhexietemplate
Prairie points rings:
1. Print out the hexie templates on cardboard template and cut out. Work out which colours you wish to use for the outer ring and the inner ring triangles. (Contrasting colours recommended.) Stack a few layers of your fabrics chosen and trace hexies touching as shown. You will need a total of 12 of each size per ribbon. (Note: I was making 3 ribbons so I have quite a few shown here.) Pin the centre of each hexie through all layers. Use sharp scissors and cut along the zig zag line, then down the vertical lines.


2. Fold each hexie right sides together in half (between two points). Then fold twice more into an equilateral triangle to make prairie points as shown. Press.
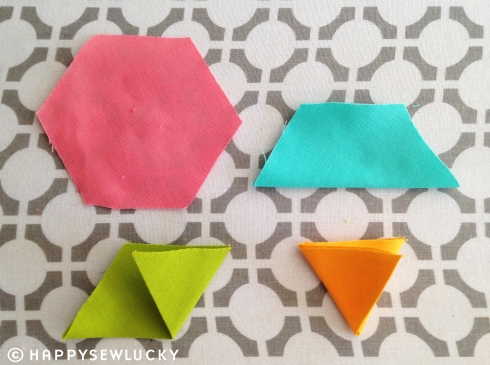
3. Now carefully trim the inside triangle tips down as shown, and press. (This is to help reduce bulk in the prairie points ring when assembled.) Do this for all prairie points big and small.

4. Start with the smaller inner ring template and arrange the prairie points on the template, interlocking them as you go.

5. Place a small dot of glue on the inside corner of a triangle, close to cut edge, and finger press down. (Make sure no glue oozes out or is visible.) Repeat all around the ring on both sides so that all corners are secure. Allow to dry or give it a quick press with the iron – no steam – between parchment paper or using a press cloth.


6. Stitch the inside cut edges to make sure they’re secure a scant 1/8” from the cut edge.

7. Repeat steps 4, 5 and 6 with the larger outer circle triangles.
8. Place small dots of glue, close to cut edge of inner circle. Carefully centre the small inner ring on top of the large outer ring, taking care not to smear the glue. Press down and allow to dry. (Whoops! I forgot to stitch the inner edge of this grey ring!)


While the rings are drying let’s prep the other elements.
Front & back circles:
9. a) Cut two circles out of the iron-on fleece:
- 1 x small – 2 5/8” diameter
- 1 x large – 3 3/4” diameter
b) Iron the small circle onto the wrong side of the fabric that goes underneath the button on the front.
Iron the large circle onto the wrong side of the backing fabric. Trim a 3/8” seam allowance around both circles.


c) Stitch a basting stitch all around the circles just inside the cut edges. Pull the thread ends together to gather the fabric inwards. Press circle with right side up. (Fleece may melt if ironed directly.)
10. Prep the ribbons:
a) Optional but recommended tip: If I had to make more of these I would interface my ribbon fabric. (I had to starch the crap out of mine) So I recommend ironing interfacing ono your fabric before cutting.
Cut three strips 9 x 2 ½. (Note: I made mine this width as I was fussy cutting the text on my fabric for fun descriptive words for my ribbons. You can make these fatter if you prefer. If you would like to use & fussy cut the same fabric I used, you can find it in my Spoonflower shop here: Improv Adjectives fabric. There are 367 adjectives per half yard to choose from!) Fold the strips in half widthways, right sides together. Stitch down the length, backstitching at start and finish. (Seam allowance ¼”.)


b) Press seam open with seam down the centre of the back. Stitch across the bottom, backstitch at start and end.
c) Trim the corners of the end stitched closed. Turn right side out, starch and press.
11. Complete the rings.
a) Hand-stitch the front ring to the back ring with vertical stitches, close to the cut edge, only going through the back layer of the front ring of prairie points, so that the stitches don’t show on the front.


b) Stitch around the circle between the two rings – slipping the needle through the in-between layers. This step may be a bit of overkill, but I think of it as insurance. Wouldn’t want someone’s prize ribbon falling apart after a couple of years!
12. Assembling all the elements:
a) Pin or glue-baste the front circle onto the front of the rings. Applique stitch into place.


b) Cut 3 or 4 circles of the batting scrap about 1 ½” in size. Place the ring front side down. Place these in the ring hole to fill the gap.

c) Arrange the ribbons in order, then place them right side down on the back of the prairie points ring. Glue-baste in place, taking care not to get glue anywhere that will be visible. Place the back circle right side up on top, centred on the ring of triangles. Glue-baste or pin in place, then appliqué stitch around the edge.


When you get to the bottom of the circle be sure to stitch through the ribbons but be careful to keep the stitches hidden from the front view. Then add a few sneaky stitches between the layers to make sure the ribbons are secured in place.


d) Stitch the brooch pin onto the back. I used large safety pins as I couldn’t find my box of brooch pins, and they work just fine.

e) Now for the cherry on top: Pin the button centred on to the front. Whoohoo, you’re done! Put on your fancy shoes head to the show!

I’d love to see yours if you make some. So please tag #prairiepointsshowribbon and @happysewlucky


 *10% off for today* (Etsy store only. Price already adjusted.) Inspiration behind this block: On August 6, 1945, #SadakoSasaki was exposed to radiation from the atomic bomb in Hiroshima. She")


I’m going to attempt this for our next guild challenge. Wish me luck, I suspect they won’t be quite as amazing as yours, but I’ll do my best!! Thanks for the tutorial B!
Rebecca
I’m sure yours will be gorgeous!
I found the regular templates for the circles and placement of triangles, but I don’t see the hexie templates. Am I missing something??
Hi Jada. I had listed the hex sizes but mentioned a template without uploading one. Sorry about that. I have uploaded one now for you. Good luck with your ribbons.
Thank you so much for this post. The ribbons are perfect for our quild show. I’m making 70 of them!!